
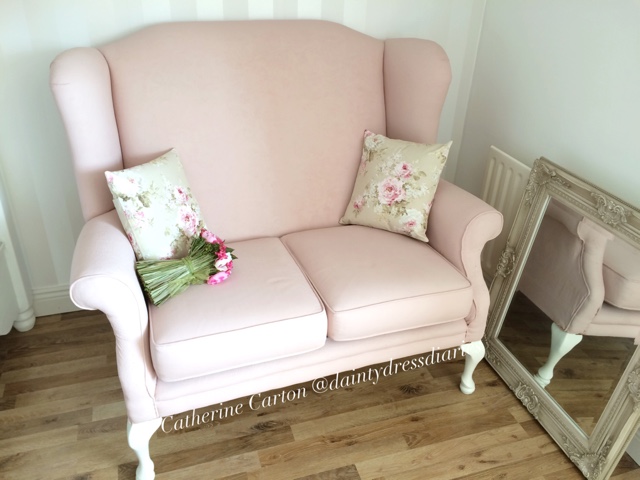
My hand painted fabric chair.
Hi Guys I just wanted to pin this post back to the top of the blog as it was one of the most popular diy tutorials and I get asked lots about this pink chair when I post a pic on Instagram, people are shocked to find out that its actually painted and not upholstered pink, so have a little read at the post below.
Yes nothing is safe now! I painted a fabric chair and love it!
So I got this chair for free a few weeks ago and was thinking of upholstering it, after a bit of Pinterest and YouTube idea searching I stumbled across people who painted fabric?!
So with nothing to lose I decided to use chalk paint and wax and it turned out great and I saved myself a fortune!

One of the things I thought about painting a chair was “but it will rub off?”
Nope! Once sealed with wax it transforms into a denim/suede feel and I have tested it and it will not rub off on clothes.
Below I am going to give a clear and simple step by step on how I done it, it’s quite a long post so please bear with me or have an aul scroll if your like me and just read blog posts for the pics lol x
What you will need??
Patience, chalk paint of your choice, a spray bottle for water, furniture wax, lint free cloths, light grit sandpaper.
I say patience as this is a job you will not finish in one day, so take your time and allow each step to fully dry before moving on.
Step one.
Prep, not as much prep as painting furniture, all I did was vacuum the chair of small hairs and dust so it wouldn’t stick to the paint.

As you can see from the before picture this chair had seen better days. It had faded in places and the bottom cushions are a different colour.
Step two.
Paint! Wet your fabric with your spray bottle of water and paint on. I used a normal brush nothing fancy and the wet fabric means your paint will glide on. I used autentico paint which is thinner so i didn’t water down my paint but I know if using Annie Sloan some people water that down.

Step three,
Once fully painted allow the piece to fully dry before waxing. I let mine dry for roughly 12 hours. I painted in the morning and waxed before bed, I didn’t want to seal in any damp which could turn to mould.

The difference between first and second coat.
Step four,
Wax, seal In your paint with the clear wax. At this stage the paint will feel hard but once you rub in the wax it turns to a lovely soft feel, almost like a denim feel. You can lightly sand your piece also as this makes it extra smooth.
**stains**, if any stains bleed through then spot treat with a primer and carry on.
Thankfully I only had one stain and it actually disappeared with the second coat. Sometimes when you wax, the stains can come to the surface, don’t let this stop you, either spot prime or do another coat and it will go away.
My bottom cushions had visible stains when I painted them and they didn’t show through.


This pic is the chair going through what I like to call “the ugly phase”, it’s had its first coat of paint and wax and is looking rough, but don’t worry it will be fabulous after a second coat and another day.
Step five,
Repeat, so this will be your second coat of paint. The second coat goes on gorgeous and your piece will start to come together.
Paint on your second coat and I found it glided over the wax and I didn’t need as much water to get the paint to glide on.
Coverage is fantastic on the second coat.
Then let this dry and then another coat of wax/light sanding.


Step six,
Optional third coat of needed, I did a third coat on the bottom cushions as you will see in the before picture that they were a completely different colour and much darker.
These came up a treat on the third coat. Sometimes with lighter colours like the one I used it could take more coats.

I painted the small legs on mine in a cream eggshell paint I had as they were quite shabby with old paint and scuffs on them.
You need to allow up to 3 weeks for the paint and wax to “cure”, curing and drying are two different things, which I recently learnt.
When you paint anything it has a cure time. This means even though it’s dry it takes time to fully cure and using it too soon before it cures can cause chips and cracks, i’l put a sheet over this chair for awhile and let it do its thing.
My little cushions I made and I got the floral fabric in hickeys.
When I have more time I will make some bigger cushions to make it more fuller.

Overall I am really pleased with how this turned out.
This chair is for my bedroom bay window so is more for decoration but delighted with the look and feel and what I saved versus upholstery cost.

I also have to say a big thank you to all my friends and family as they are so good at sending free furniture my way. If it’s a neighbor throwing something out or a chair on the side of the road, your always so good at keeping me in mind.
Feel free to message me through the contact form or over on Instagram (@daintydressdiaries) if you have any questions or would like to share your up cycles with me, I love seeing what everyone else has made.
Thanks for reading.
Chat soon.
Catherine.
Xx


Author
Hi Michelle, I wouldn’t recommend for kitchen chairs, I would recover them with fabric so they will be more hard wearing. I recovered a chair and it is easier than you think. You just need your staple gun and good fabric scissors and some pins. x
Hi Dainty!
I want to give the fabric paint a go on some kitchen chairs, thanks for tutorial!
Only question I have is, what is it like to sit on afterwards? Would it be comfortable for a kitchen chair?
Thanks!
Hiya, thanks for reading! Great! If it gets any hard areas like the arms I just massage in some clear wax to soften it. The chair isn't used everyday, it's mainly a chair for the cat lol x
How is it holding up now Catherine?
Thanks so much for reading Claire X
Wow the chair looks so elegant ! Beautiful job Catherine x
I'm so glad you liked it Monte! Thanks for reading.
Aw thanks for reading! Let me know how you get on if you try it X
The chair looks awesome!! Thanks so much for replying to my questions about it!!
I'm so glad you made a post about this, I've always wondered about your little pink sofa and re-upholstry is not something I am skilled at. Now I need to try this!
You make everything look so pretty & make it sound so easy!!! ❤️
Hi, Could you tell me what colour dud you use, just beautiful!
Aw thanks so much for reading Marianne X
Hi Catherine, some difference in the before and after, great job!! Xx
Thanks Sandra, thanks so much for commenting x
this is fab xx
Aw thanks camille! Thanks for reading x
The transformation is amazing! It's so fab Catherine! xxx
Aw thanks Siobhan, thanks for reading x
Aw thanks! Thanks for reading x
Thanks x I used autentico furniture wax. If your doing your kitchen table and chairs i would recommend varnish x
Jesus it's fabulous 🙌🏻 -well done xx
Wow! Saw this on your Instagram feed and had to swing by xBecca | theBeautyInbox
Beautiful! What type of wax did you use? I want to paint my kitchen/dining room chairs as well!!!
Aw thanks, let me know how you get on x
Can't wait to try this! Love Blondie too ��