
I say half done as I am going to do more to the stairs, however I got a last minute appointment for surgery on my thumb for Monday so this has temporarily stalled my stair project.
However I have finished the hard part and prepped, primed and painted them so want to share some pictures and products I used.
This is quite a long post so feel free to scroll below for the finished pics and read on of your here for my how to.

I live in a dormer bungalow, my stairs lead up to my master bedroom and ensuite so they get relatively low traffic.
Painted stairs are cheaper however if you want low maintenance and your stairs get a lot of traffic then I would consider staining your wood stairs or getting a carpet.
My before pictures.

When I moved in there was this ugly brown carpet that really darkened the space, there is little natural light going to the stairs so this didn’t help at all.
So I got the mister to pull up the brown carpet not knowing what I might find underneath.
Pulling the carpet up revealed these fab wooden stairs that must of been used at some point as they had been neatly stained in a varnish.

I have a small landing that leads to the bedroom.
I really loved the rustic floor boards and seemed a shame to cover them with carpet again.
However the orange pine was a bit of an eye sore.


Products used and how to?
Prepping products.
– sugar soap ( can get from dealz for €1.49)
– sand pads for my palm sander.
– Ronseal “knot block” wood primer and undercoat.
Using my palm sander I sanded all of the wood. I didn’t sand back to bare, I just sanded lightly so the paint would have a good surface to adhere to.
Sanding will deter your paint from chipping and this step is really important.
I then hoovered away dust and scrubbed away dirt and grime using the sugar soap as no matter how good the paint it won’t stick to dirt.
I then primed using the knot block paint. I gave two coats of paint.
This primer was re coatable after 4 hours so I managed to get two coats down in the one day.


The paint?
I used a white eggshell paint.
When looking online and asking people about paint I found loads of options.
Some had used chalk paint and sealed with varnish. There is a shop on drury street in Dublin that has pink stairs so maybe check them out if your about.
Then others had used, gloss, satinwood and eggshell paints.
I also got a tin of dulux floor paint to paint on my runner, however I haven’t got a chance to use it but will do a review in a few weeks when I have recovered from surgery and I am back painting.
I went with eggshell as its really durable, has a sheen but not as shiny as gloss.
I also like the feel of satinwood but I have my kitchen table and chairs done in dulux satinwood and I had some chipping so went with eggshell.
It’s up to you which brand of paint you use, most brands have a satinwood/gloss or eggshell finish.
I used Crown brilliant white eggshell.
I gave two coats and three on the floorboards.
I found using a brush gave me better coverage and was great at banishing the bingo wings.
Once this paint dries you don’t need to varnish as the finish is really durable.
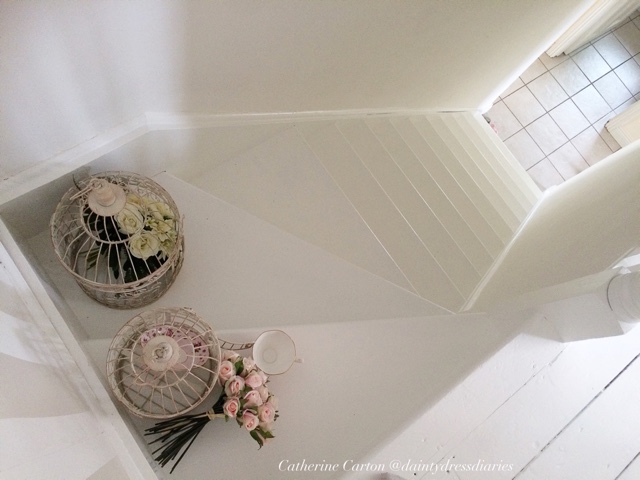
Now for the fancy pics.
Taa daaaaa!


Now so what should be my next step?
Option one – paint a light grey runner down the middle.
Option two – get a runner of grey carpet with gold coloured rods.
Option three – go made shabby chic and floral decoupage.
What would you do? For now I am loving the bite stairs, I know in the future they might not be practical but right now they work for me and I love the brightness.
I will do a review in a few weeks on how the paint is holding up and if I have had a my chips or issues. One of the things I’m also worried about is slipping but I noticed in bare feet and shoes there is no slipping but they are a little slippy in socks.
Thanks everyone for taking the time to read and please tag me in your upcycle projects over on Instagram or share the link to your blog below.
Chat soon.
Catherine.
xxx


Author
Hi Louise, it’s all about the prep and primer when preventing chips. Here’s a newer post https://www.daintydressdiaries.com/2020/06/how-to-paint-furniture-for-beginners.html with tips on painting ❣️
Hey Catherine,
Does the eggshell finish hold up after all this time?
I am painting my staircase in a few weeks and can’t decide on a finish. I dont like shiney paint so I am going more towards the eggshell but am afraid if it chips or is not hard wearing.
P.S love your work xxx
Recently I've been getting into Shabby Chic (lots of clients love this style) and I found this while browsing for inspiration. Outstanding work Catherine, the new stairway brought a ton of charm to the place and it looks great! I use a random orbital sander for this type of work, they cut the time and effort needed in half. Again, excellent job!
Thank you so much for reading X the thumb is doi great now thank god X
It must've been frustrating to stop a DIY project (and see it pending every time) as you get better from the surgery. Anyway, glad you finally finished this – it looked great!
Aw thank so much Siobhan, will be on the mend soon x
It looks amazing! Nice job and best of luck with your lil procedure! Siobhan xx
Aw thank you Sylvia, that's so sweet of you.
Hi Sweetie, You have done a fantastic job, It looks so pretty…. Good luck with the surgery x